
Blog
Make Your Own Seed Paper and Help the Pollinators...and our Planet!

In honor of Earth Day, we want to share our special Wildflower Seed Paper "recipe" so you can make your own seed paper from recycled paper to share with friends and family.
Jameson Humane is seeking new ways to improve our relationship with the planet. We are making seed paper!
What is seed paper?
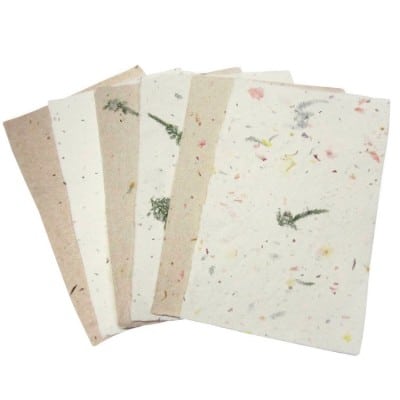
Seed paper is exactly what it sounds like; it is paper with seeds embedded inside of it. Wildflower seeds, vegetable seeds, you name it—just plant it in soil, and watch it grow!
Making seed paper is simple. Blend up some recycled paper with water, and don’t forget to stir in the seeds. If they are blended, you risk harming them. Next, spread the ‘pulp’ across a flat surface and let it dry! Voila, seed paper!
Making seed paper is yet another way Jameson Humane acts to foster harmony between humans, animals, and the planet. By planting seed paper, you encourage bee pollination, stimulate butterfly populations also known as a kaleidoscope, and of course, grow our relationship with the planet to live a kinder, more compassionate lifestyle.
What you will need:
- Blender
- Cookie Cutter (optional)
- Flat Surface (like a cookie sheet or baking tray)
- Recycled Paper
- Seeds
- Spatula (rubber is best)
- Sponge (optional)
- Strainer
- Towel or Old Flanner (microfiber towel, or terry cloth)
- Water
Step 1: Gather Paper, Tear, Put into Blender
You will start with gathering the recycled paper that Jameson Humane has provided you. You can also use extra paper lying around the house such as newspapers, scraps of unprinted computer paper, tissue paper, or perhaps even junk mail (nothing with a glossy finish though). After you have gathered your paper, tear or shred it into very small pieces. Now, fill your blender half way with your torn pieces of paper.
Step 2: Pour in Warm Water, Blend into a Smooth Pulp
Next, pour warm water into the blender so the paper is fully covered and the blender is just about full. Now you will blend together the paper and the water for about ten seconds to create a mushy mess or until the mixture looks like a fine pulp. After ten seconds on a low setting, increase the speed for about thirty seconds more. After this there should be no visible paper flakes remaining (increase blend time if you still see paper flakes).
Step 3: Stir in Seed, Strain
Now it’s time to add the seeds! Sprinkle about a teaspoon of your seed of choice into the mixture and fold them in. DO NOT BLEND! Stir them only. After you have added the seeds, pour the mixture into a strainer to drain off as much water as possible. Use a spoon or spatula to press the mixture against the strainer to squeeze as much water as you can from the pulp.
Step 4: Spread Pulp, Flatten, Dry
Place a piece of terry cloth, microfiber towel, or flannel on a flat surface, this is where you will form your paper. Dump the pulp onto the fabric and use a spoon or spatula to spread the pulp over the fabric. Be sure to spread it as thin as possible to ensure it dries quicker. You can spread it into any shape you want—we recommend using a cookie cutter to make fun shapes! After you have spread the pulp, use a sponge to flatten the mixture and soak up more water. After the pulp has dried on one side, turn it over and allow the other side to dry completely. Once both sides are dry, your seed paper is ready for use.
Step 5: Cut and Decorate
Cut the seed paper into post-card sized pieces
Seed Paper Makes Great Note Paper, Invitations, Post Cards
Seed paper can be used for many things such as note cards, invitations, or postcards. They make great stationery that can sent to friends and family, and will bring joy for years to come. Be sure to include that the homemade seed paper can be planted in soil and once watered, it will begin to grow. Seed paper makes a useful paper product that would otherwise end up in a landfill. A seed paper invitation or card is truly the one thing that is okay to litter!